.This fellow has caused quite a bit of debate among the other demonstrators in the team I belong to, with some saying he is scary and others liking him for the traditional feel he brings. What do you think? I was in two minds, but bought the set anyway (gotta get those Christmas cards sent early this year!) and now he's grown on me. I certainly don't think he's scary!  This was a really simple card to make, yet so effective. For the front I used Very Vanilla cardstock on Riding Hood Red, and used the matching ribbon to create a bit of elegance as well as tie the whole Christmasy theme together. The ribbon is newly available from the Spring Mini catalogue for $22.95 for a whooping 9 metre roll. To 'pop' the greeting up I covered it with Crystal Effects dimensional lacquer ($13.95), which gives a page pebble effect.Inside the card I have used Very Vanilla for the inner panel, and have stamped the holly and greeting using Old Olive and Riding Hood Red ink. This set (Good Cheer - $46.95) is great value as you get a phrase for your card inner as well as the images.
 Stay tuned for more peeks of what I've made from the new Spring Mini (have you got yours yet??).
.Oh dear, I've been a bad blogger! But it's a new month and I intend to change my ways, and what better inspiration than the new Spring Mini catalogue from Stampin' Up! I had a great launch party yesterday - wow, haven't had that many people in the house in years! I made some samples using the new sets, and my favorite one is this very masculine card: The stamp is from the set Uncharted Territory ($40.95), which also includes a very cool lighthouse stamp. I've used the new Parisian Breeze Specialty DSP ($27.95), a textured cover-weight paper in delicious shades of Baja Breeze and Chocolate Chip, in this very simple but effective design. The yacht and sentiment are stamped onto white gloss card with black Stazon ink, and then sponged with Baja Breeze and Pacific Point inks, which are then polished off to give a soft look. The strip of Baja Breeze is attached to the layout with clear rhinestone brads and dimensionals to give additional depth. This design would be great for a scrapbooking layout too. I got it from a blog called Cat's Scratching Post.
Please contact me if you would like a copy of the new Spring Mini catalogue -
it's packed full of great ideas and inspiration, and best of all it's free!
.It's been another busy day today, with one workshop done and dusted! We made the following items at the Cards and More workshop today: - A flower pot card
- An origami box
- A cute baby card featuring a punch art lamb
- A card using the the gorgeous Friends 24-7 set, heat and stick powder and Aqua Super Nova glitter
- A tri-shutter card using the Haiku designer series paper.
I haven't had a chance to photograph any of them yet, but here is a card we made at last month's workshop:
 This is a classic waterfall card; when the tab is pulled down the three images flip over to reveal each other. I have used the animals from the new Pun Fun set - really easy as I mounted the accompanying words separately on the end of each block. The sentiments are stamped using the very versatile set Short & Sweet - a great set to use with the circle, oval and label punches!
All going well with the weather I will photograph this month's projects and post them here soon. If you would like to know how to make any of the projects shown on my blog please contact me, and I'll gladly send you instructions or links to resources I have used. Thanks for looking!
Waterfall card Recipe:
Cardstock: Pink Pirouette, Whisper White
Ink: Going Gray, Baja Breeze, Pink Pirouette
Stamps: Pun Fun, Short & Sweet, Cupcakes
Accessories: Silver brads, Pink Pirouette striped grosgrain ribbon
.I love the new In Colors, and the ease with which they go together! I created this really quick and easy card in next-to-no-time using ONLY the In Colors (plus a little bit of Whisper White!): The main color in this card is Kiwi Kiss, a colour I wasn't too sure about at first but now love. I gave the card a retro feel using the 1/2" circle punch to create a border of Kiwi Kiss and Pacific Point (a real 'ooh-la-la' combo), and finished it off with a dab of Dazzling Diamonds in the middle of each punchie. The greeting is punched out using the Designer Label punch, with a bordering 1 3/8" circle punchie. The Pacific Point striped grosgrain ribbon just finishes this card off nicely! It also occured to me after I made it that it could pass as a 'male-friendly' card, especially if I had used the handle of beer image from the Cheers set!
If you don't have these colours yet then what are you waiting for?? Contact me NOW to order the matching card and ink pads. For those of you who bought the latest Stampin' Up! catalogue from me, the voucher for this month allows you to buy four ink pads and receive a fifth blue one for free! But if you didn't get a voucher book don't worry, you won't miss out. For this month only you can take advantage of the same offer if you email me and mention that you saw this offer on my blog! So... what are you waiting for??
.I love this Top Note die! It is made exclusively for Stampin' Up! by Sizzix, but sadly is not yet available in NZ. However, I live in hope that it will be coming to NZ soon - maybe in one of the mini catalogues that are due out on 1st August, 1st December and 1st April (2010). I can dream!!
The theme of this swap was 'Your favourite card layout', and at the moment this is my favourite! I'm pretty fickle though, so my favourites change quite regularly!! I have used the stamp set Spring Song for this card. As soon as I saw it in the catalogue I fell in love with it and knew I had to have it! All three stamps from the set are used in this card - they just go so well together. The set costs $30.95 so is great value for money! LOL - but can you tell I have never seen a hummingbird before in my life?? I chose to use only the current In Colors on this card, so please forgive me if the bird is not colored in correctly!

 Here is the recipe:Inks: Pacific Point, Riding Hood Red, Pink Pirouette, Baja Breeze, Kiwi Kiss, Tangerine TangoPapers: Whisper White, Pacific PointStamps: Spring SongAccessories: Eyelet Border punch, Top Note die (USA only), blender pens, sponge, Dazzling Diamonds glitter (to give it some BLING!)
-Whew! I've had one busy day! I taught a beginner's scrapbooking class at Kamo High School with six lovely ladies who hadn't scrapbooked before, and they did really well!! We made two and a half pages (one was the hinged page I talked about in an earlier post - with my god daughter in the Santa Parade - hence the 'half' page) and they got to take away enough materials to make a third page. It really took me back to the time when I first started scrapbooking, and I ended up digging out photos of the first albums I made for my nephews - scary stuff!!!
Anyway, so while I was busy working away other members of the Creative Inkers team (the Stampin' Up! team that I belong to) were busy attending a team training day in Auckland. I'm sorry I missed catching up with those of you who were there today, but I'm sure there will be other times. Here is a photo of my swap that I sent down for my team mates - I made 30 of these little purses in no time at all, so very fitting for the theme of the swap: "A Simple Workshop Demonstration Item".
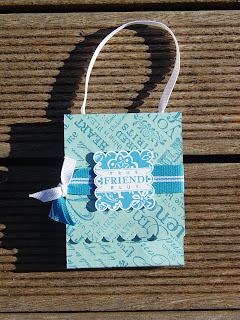 And the purse opens to reveal a surprise... Kit Kat!! I'm not too sure how many purses will still be full by the end of the day though {wink, wink}. All I know is that they were lucky to get them as my auntie has taken a liking to Kit Kats since I started making these (she previously claimed not to like chocolate!).
 If you would like the instructions for making this cute purse please email me at rmkaire@xnet.co.nz. Have a great weekend and keep warm wherever you are!
. Well, you might need to click on this photo to see the pages in their full glory, as I cropped it before uploading - it's so hard to take a shot of two 12x12 pages side by side!! This DSP is so girly, and perfect for some shots of my lovely niece Moana as she turned the big ONE! The photos aren't the best, but they just go perfectly with this paper. It's also not my usual style to make two pages symmetrical with each other, but it worked really well in this case.
Here's the recipe:
Papers: Whisper White, Rose Red, Kiwi Kiss, Raspberry Tart DSP
Inks: Rose Red
Stamps: So Swirly Jumbo Wheel
Accessories: Eyelet Border punch, 5 Petal punch, Boho Blossoms punch, Ticket Corner punch (USA only), Top Note Sizzix die (USA only), Silver Hodgepodge Hardware, White Gel Pen.


